Groups

|
Archived Page This article has outdated information. It is now archived, only kept for historical purposes. Generally, outdated articles write about how to use or interact with the Roblox website. The services and features as written at the time have been changed or removed by Roblox Corporation. External links may be substituted with a Wayback Machine archive link. |
Groups are special groups for Robloxians to join. They help keep track of all the members, so, if for example, it's a "clan" or war group, you know when to join them for a big battle or if it's a building group, then maybe to help out building a new place. With a group wall, group shouts and a group building place the Groups system really helps to keep your group of friends together!
Requirements
Making a group requires Builders Club, Turbo Builders Club or Outrageous Builders Club. It also costs ![]() 100. This is a one time fee. Joining groups is free, however you can only join a certain amount of groups. Buying a variety of Builders Club will increase this amount, depending on the variety you purchase.
100. This is a one time fee. Joining groups is free, however you can only join a certain amount of groups. Buying a variety of Builders Club will increase this amount, depending on the variety you purchase.
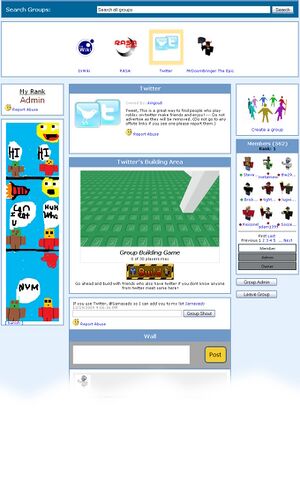
The main groups page
There's a lot on this page, but it's not too hard to rummage around.
Top 'o the page
At the top of the Groups page you can see the Search Bar, useful for finding a group you might have heard about.
Right under that is a box with the different groups that you are in. If you're new you probably haven't joined a group yet, and this box will be empty. There are a bunch of different groups to jump into, just keep an eye out for one that sounds cool! If you have joined a group they will show up in this box. Click on one of 'em to see the information about that group.
From now on I'll assume that you've found a group and joined it. For the pictures here I used the Twitter group, but they're the same on all groups.

In the middle of the page is the Description of the group, giving you details about what the group does and what kind of members they're looking for. Good information here!

On the way left you can see your Rank in the group. Ranks can be custom named, so you can expect anything from NOOBZOR to AWESUM DUED. Under that is an advertisement.

Over on the right side you can see the big Create Group button. This brings you to the Group Creation page, which you can read about over here.

Under that box you can see the long Group Members box. This displays the number of members, a list of them and which rank they fall into. Click on the rank you want to see the people in that rank.

Under all the other boxes you can see the Group Wall. This is a nice long thread, kind of like comments, where you can post what you want to say. A little blurb is fine. You can also, if you have permissions, use the group shout. This lets you make an announcement on every member's feed with whatever you want to say.


The buttons under the member list let you leave the group, which you can re-join later. If you have permissions, you can also go to the group administration page, where you can change settings for your group.
Group settings

Group settings can be managed if you the group's owner.
With group settings, you can set the specifications for joining users, and whether or not your group can have enemies.
Enemies are other groups that you aren't allied with. Usually, only war clans will use this feature. When this is on, other groups can declare you as an enemy and vice-versa. Unlike allying, declaring someone an enemy doesn't require the consent of the other group. So watch out for your enemies.
Permissions
Permissions are the ability to do some advanced things on the group that you are a part of. For example, if you are the owner of a group you can change the picture or the description, as well as set member permissions or boot people from the group.
Let's go through the list right here

Ranks
Ranks give you an idea of where you stand in the group. New users are normally really low in the numbers and don't have many permissions. Old users and the owner of the group are really high on the numbers and have a lot of permissions. With time and proving that you're a good person you can move up in rank. Some groups have very few ranks, while others have a lot of them. Rank numbers go from 0 to 255.
Guests
Guests is a rank that isn't shown on the normal member list and can't be removed from the admin panel. This rank represents anyone viewing the group page who is not a part of the group. You can change settings for these random people the same way as a group member.
Owner

The owner is the person who owns the group. He is always the highest possible rank, there are no ranks above him. The owner always has all of the permissions, and can do anything he wants to the group. Be careful who owns the Group, he is all powerful.
Description
The group's description can be updated by the owner of the group only. This is shown on the group page, and all can see it.
Allies

With the group allies you can manage your allies.
To add an ally,type in the group's name where it says Group Name: on the
ally pane manager. Then click Send Ally Request. After that, just wait until they accept. If it has been awhile, and they haven't accepted it, PM them and make sure they got it.
Enemies

This is the group enemy pane. To declare an enemy type the group's name where it says "Enemy name here". Using this you can add/remove enemies.