Group Admin

|
Archived Page This article has outdated information. It is now archived, only kept for historical purposes. Generally, outdated articles write about how to use or interact with the Roblox website. The services and features as written at the time have been changed or removed by Roblox Corporation. External links may be substituted with a Wayback Machine archive link. |
The Group Admin page allows you to mess with the settings. Members with the Light Blue, Red, or Black are able to see and mess with the settings.
Controlling the Hordes
If you have enough Privledges, you can access the Group Admin page. It's broken down into different editable sections. What you see may depend on the permissions that you have. If something isn't there, don't worry about it.
Group Information
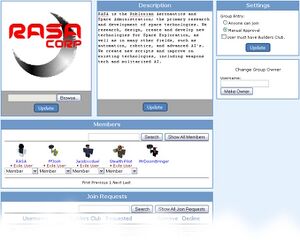
At the top of the page you can see the Group Image and Description. Feel like changing it? Go right ahead. Remember that images do go through Moderation, so make sure they follow the Image Guidelines. Your Group Description should be something that defines what your group is about.
On the right is the Group Entry settings. You can set it to Anyone joining or Manual Approval. When set to Manual Approval you have to approve new users before they can be in the group.
Also you can change the group owner if you don't want to run the group any longer. Type in a name and hit 'Make Owner'. When they accept the position you will become a member and they will become the Owner. Note that for someone to become the owner of a group, they must have a current Builders Club membership.
Members
This panel lets you tweak the user settings. You can see a list of all the different users and their rank setting. If you wish to change their rank, just click on the drop down menu and select the rank you want them to have. You can also see the red Exile User button under their name. This boots the user from the group.
Join Requests
If you have group joining set to Manual Approval you'll see a list of people who want to join your group. You get to see their username, if they have BC, when they asked to join and big buttons to accept or decline them.
Up at the top is a search bar. If you have a specific friend to asked to join you can look for their requests using that search.
At the bottom of the list are two big Accept ALL and Decline ALL buttons. They do exactly what they say, either allow all the requests in or deny all the member requests.
Rank Settings
At the bottom of the page is the Rank Settings menu. This might look a little complex, but it's actually pretty simple.

1. Name and Description
This is what the name of each rank will have. Click the Create button to make a new blank rank (each rank costs 25 Robux).
2. Rank Number
The Rank Number is where the rank is compared to other ranks. The higher the number the higher the rank. Guests are the lowest, at 0 and Owners are the highest, at 255. Other ranks can be spread out through here. Normally the more permissions you have the higher rank you are. Rank numbers also define who can promote who, given the proper permissions.
3. Rank Settings
This is where things get interesting.
A rank level can have individual permissions set, for example in this picture only the Owner and Admin can delete posts on the group wall (purple). Look at the 4. Legend to see what permission is what.
Remember that Guests are any random people who visit your Group page. So it might not be a good idea to let them all post on the Group Wall, but it would be good to let them see the wall, like I've got them doing in my group.
Another note is that the names should probably mean something. Naming the people who can do almost anything 'Admins' makes sense, but naming them 'CARL' and your regular Members 'JOHN' both doesn't make sense and can be terribly confusing. But hey, it's your group, name them what you want.